
Introduction
What is IFTTT?
If This Then That, also known as IFTTT is a free web-based service to create chains of simple conditional statements, called applets.
An applet is triggered by changes that occur within other web services such as Gmail, Facebook, Telegram, Instagram, Pinterest etc…
For example, an applet may send an e-mail message if the user tweets using a hashtag, or copy a photo on Facebook to a user’s archive if someone tags a user in a photo.
In addition to the web-based application, the service runs on iOS and Android. In February 2015, IFTTT renamed their original application to IF, and released a new suite of apps called Do which lets users create shortcut applications and actions. As of 2015, IFTTT users created about 20 million recipes each day. All of the functionalities of the Do suite of apps have since been integrated into a redesigned IFTTT app.
So in our previous Processing tutorial, we have read some sensor value from Arduino and the value has been displayed in an analog meter using Processing. You can see the tutorial here.
So now what we are going to do is, think to suppose we are reading a temperature value in processing and we need to get an alert when the temperature reaches a threshold we set.
so for doing that we will make an HTTP request from our processing sketch when the temperature reaches the desired value we set.
Setup Instruction
Step 1: Create an account in IFTTT web site.
Create an account in IFTTT website or you can just log in with your Google or Facebook account.

Step 2: Create An applet.

After login to your IFTTT account, the upper left corner there is a tab called My Applets, click on it.
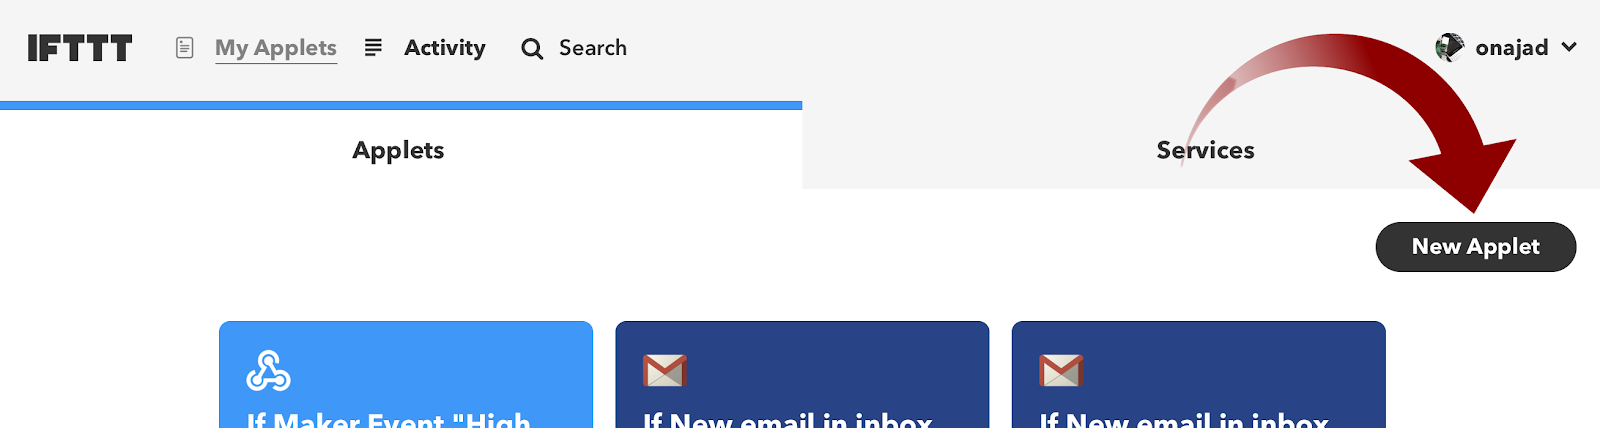
So when you are inside My Applets you can see a button called New Applets as the one I have shown in the screenshot, click on it.

Now we have reached the New Applet wizard, you can see here “if this then that” just click on the “this” to choose our trigger.
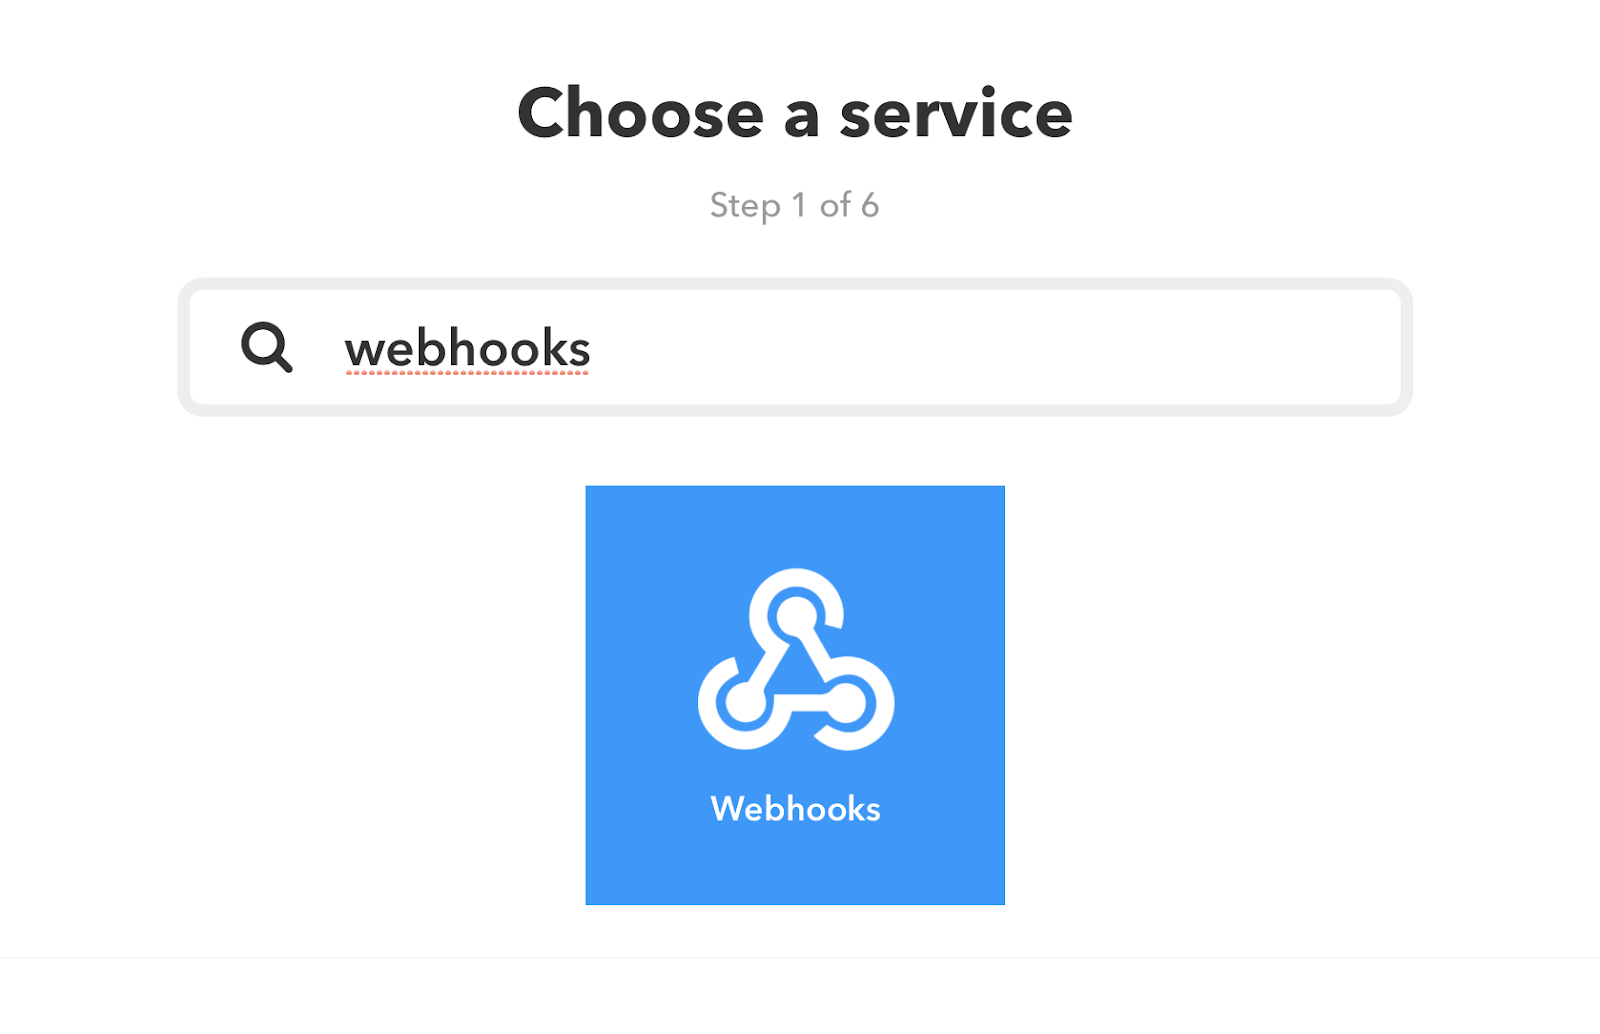
Now we need to choose a trigger service, search for “webhooks” and choose it.
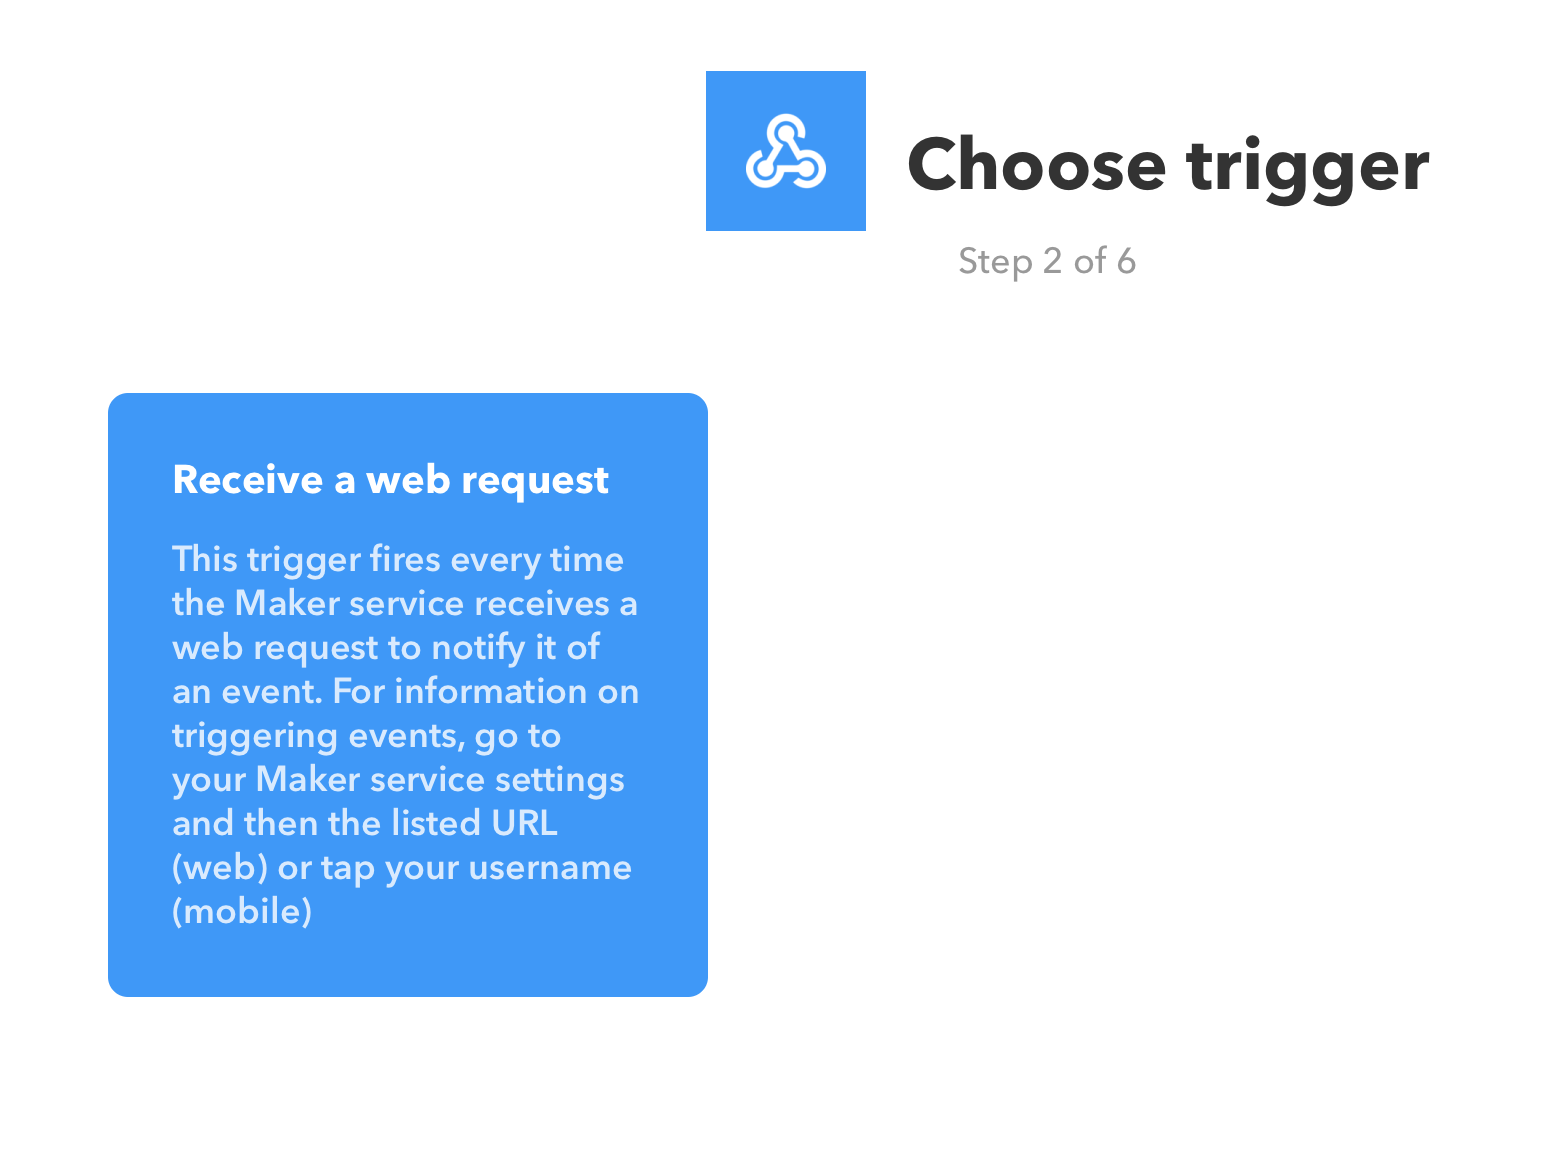
Now click on the “Receive a web request” option.
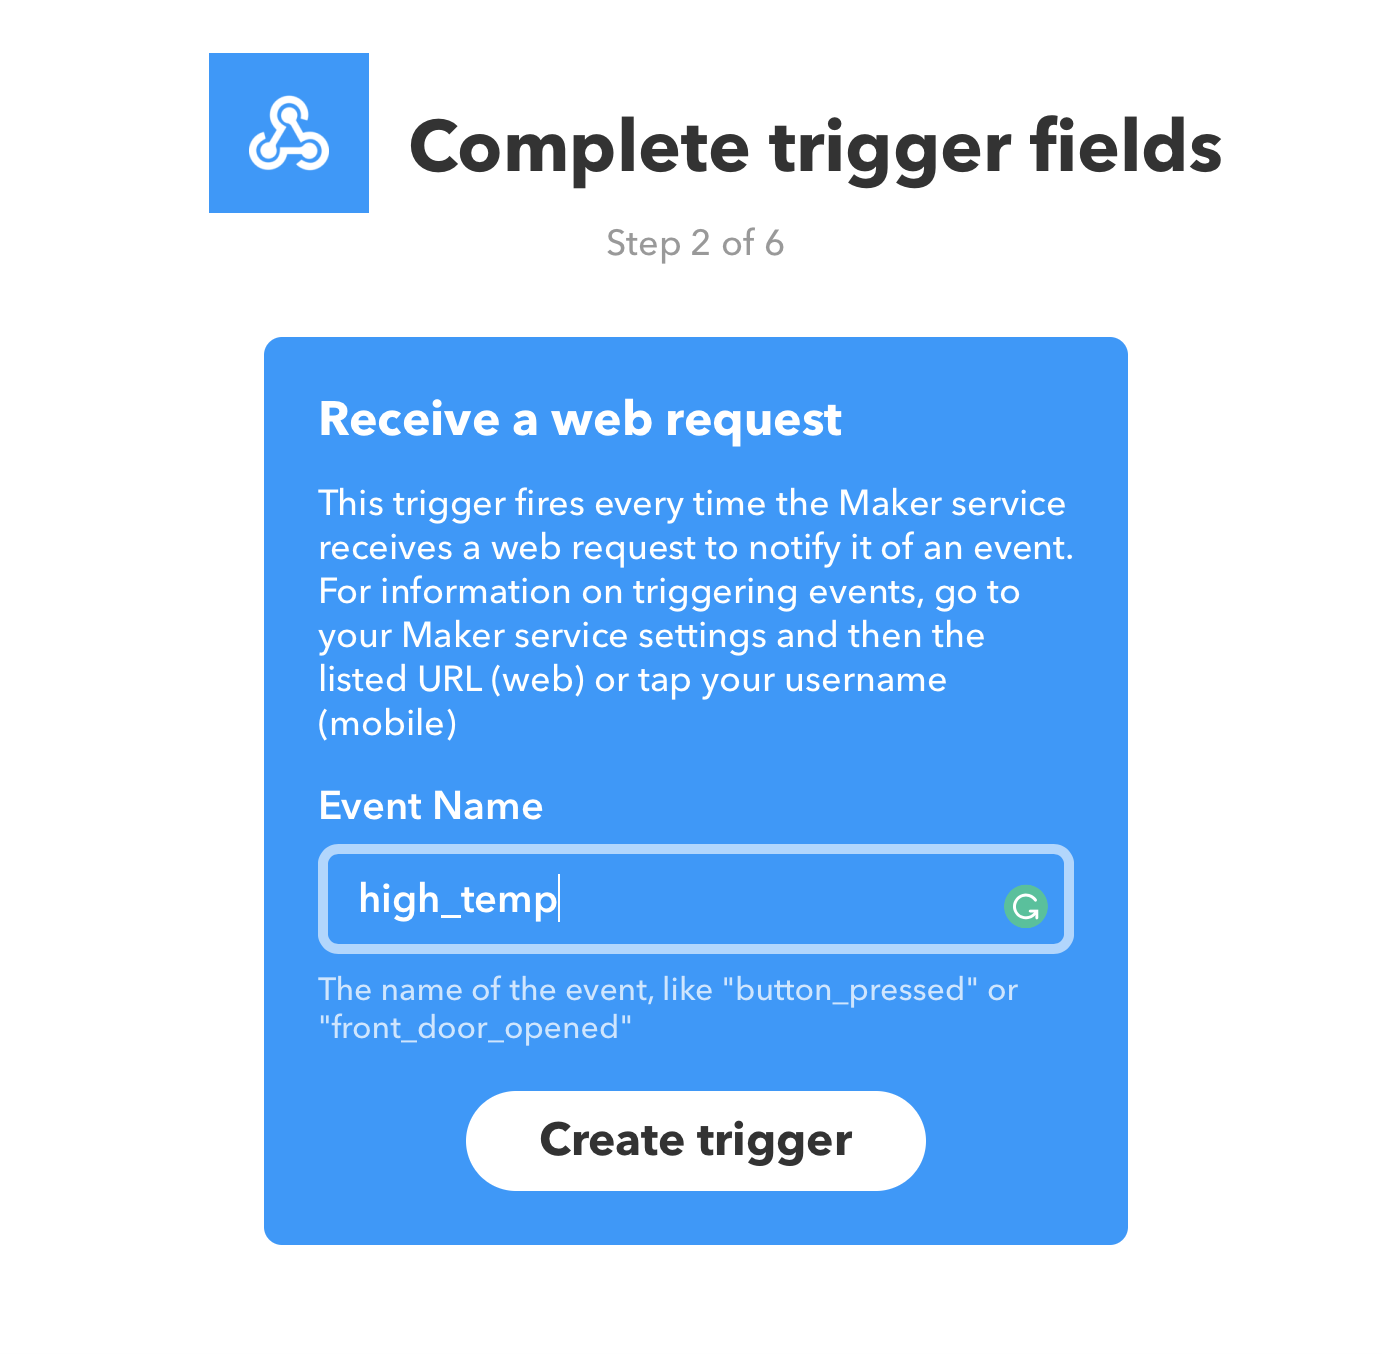
Here we need to write our event name, we can choose any name but note that no spaces are allowed especially for a web request trigger, then click the Create trigger button, So we have finished creating out “this” event.

Now we need to create our “that” event, click on the “that” button.
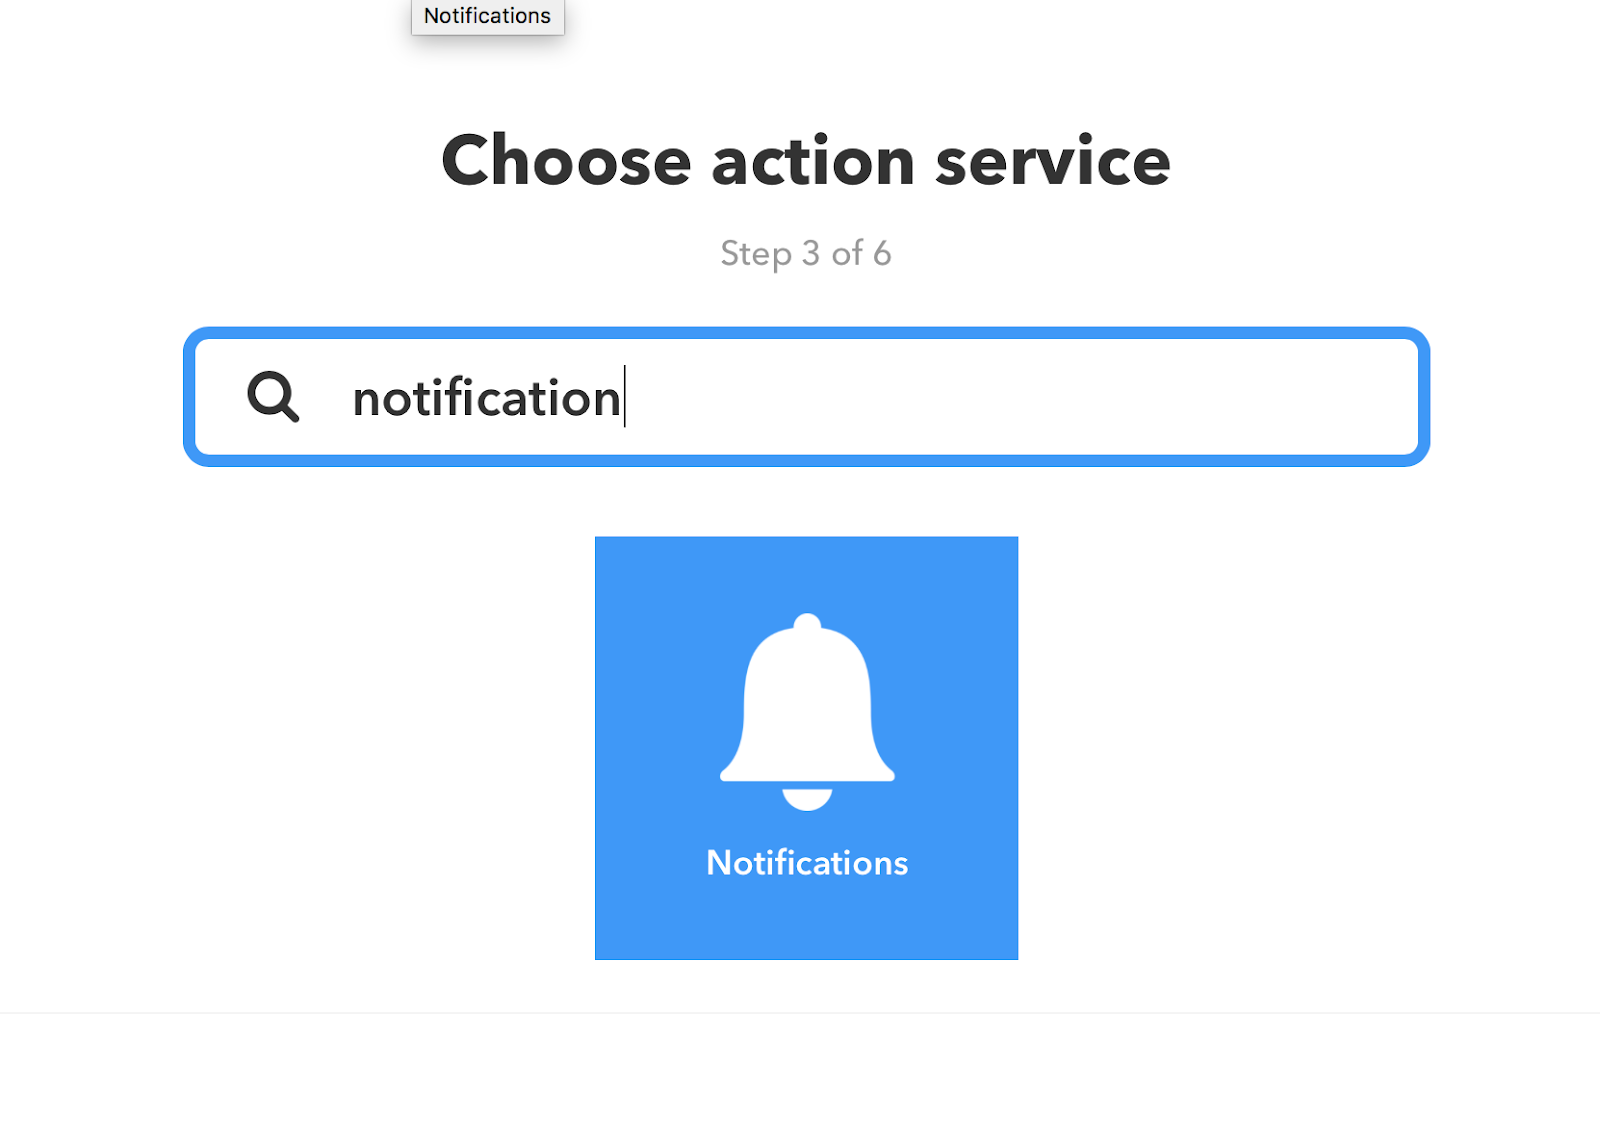
Now we need to choose our action service, here we are going to choose a notification action, which will give notification on our phone when the “this” trigger happens.
Instead of notification, we can choose anything we want like for example emails, twitter tweets and there are a bunch of other services.
Ok so search for notification and click it.
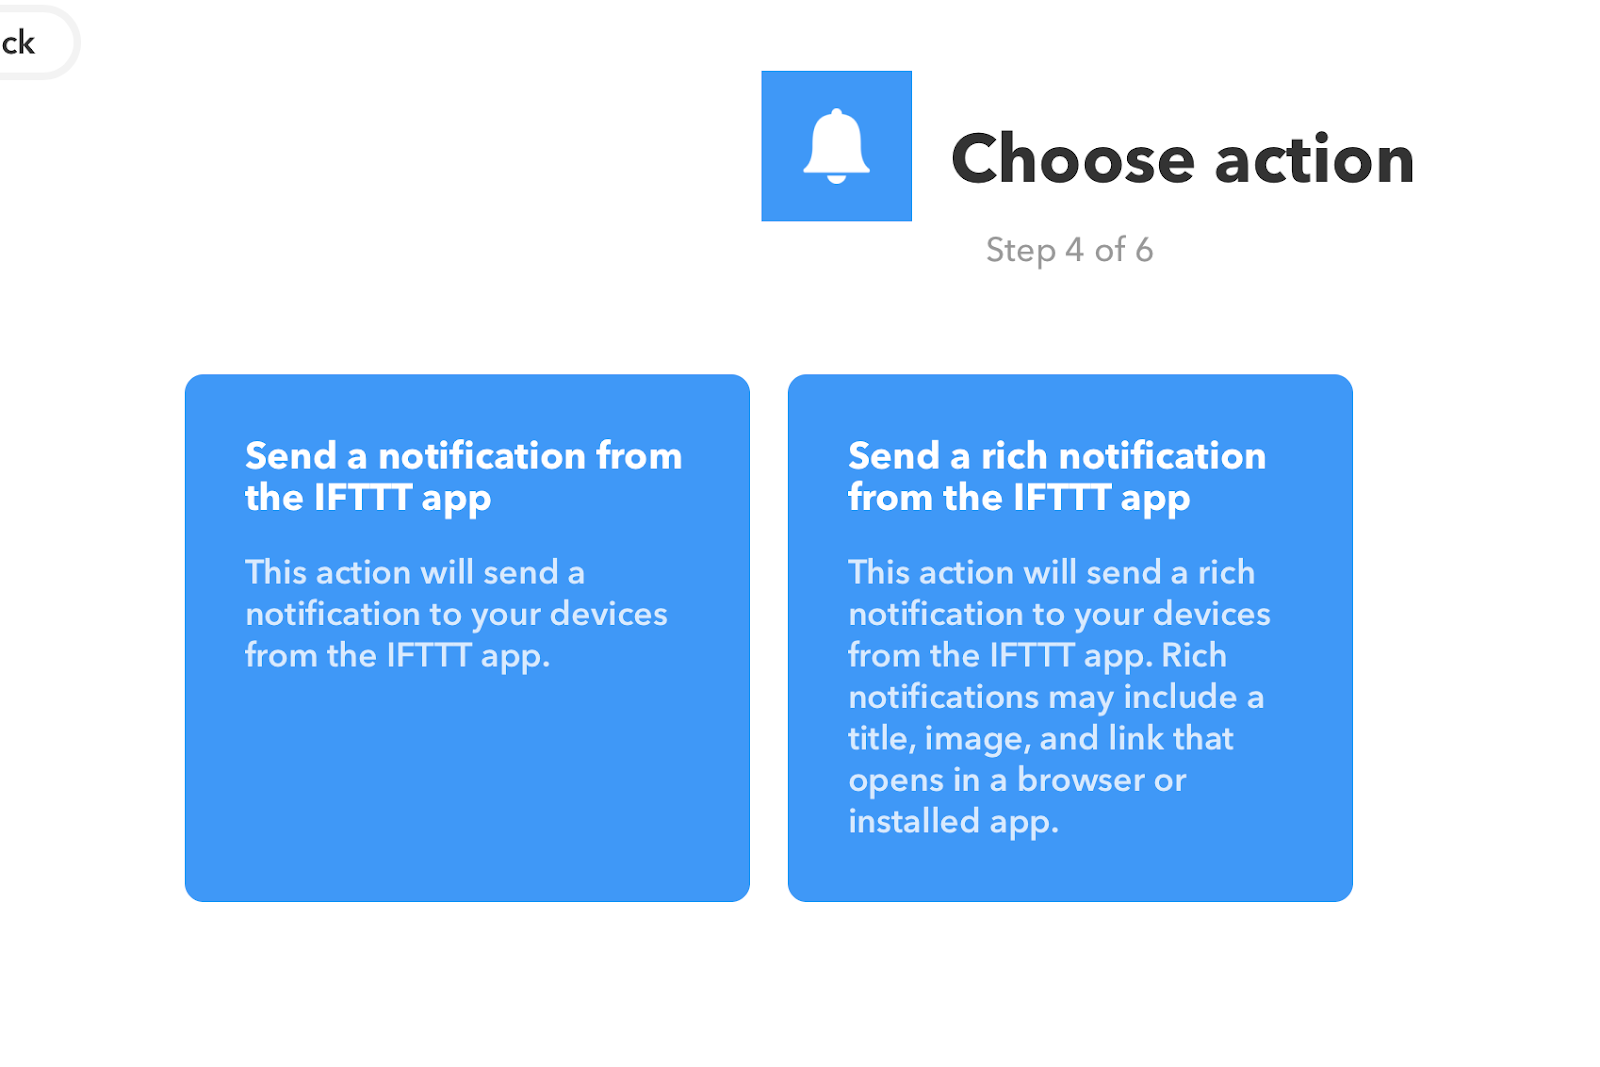
Inside notification, there are two different types of notification, normal notification, and rich notification, in the normal notification, you will just get a notification just contain a text-only but in the rich notification, we can add an image and a link any webpage we want.
I’m going to choose a normal notification.
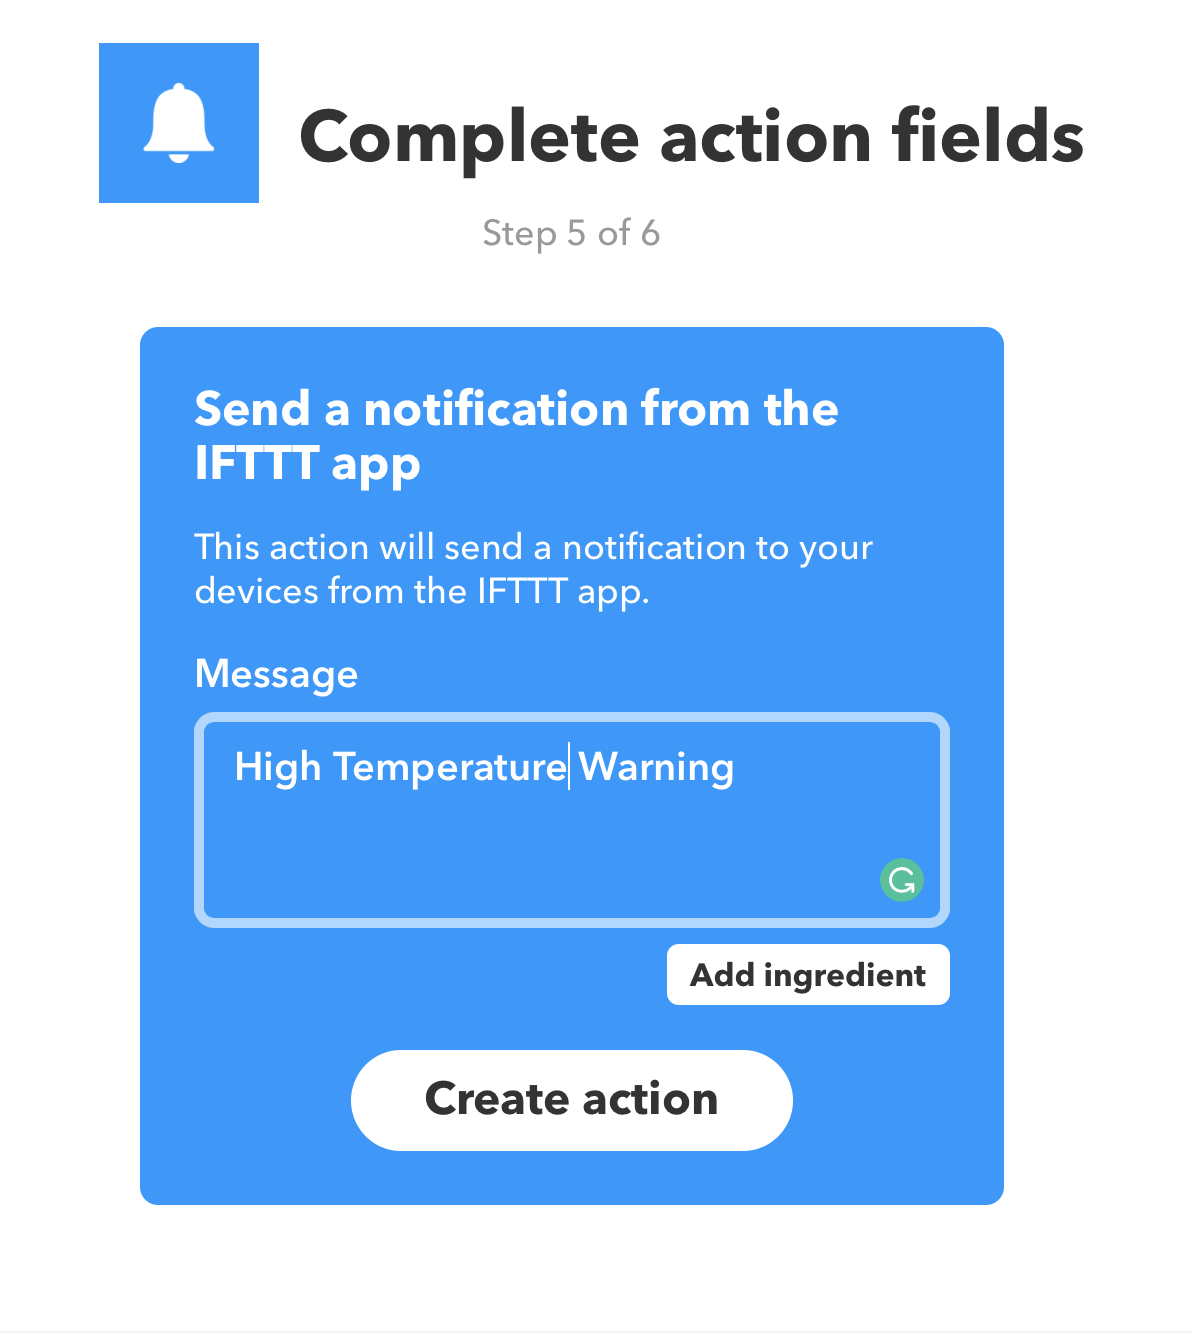
Here we can add the message which we want to display in our notification. for our example, I’m writing “High-Temperature Warning”
Now just click Finish
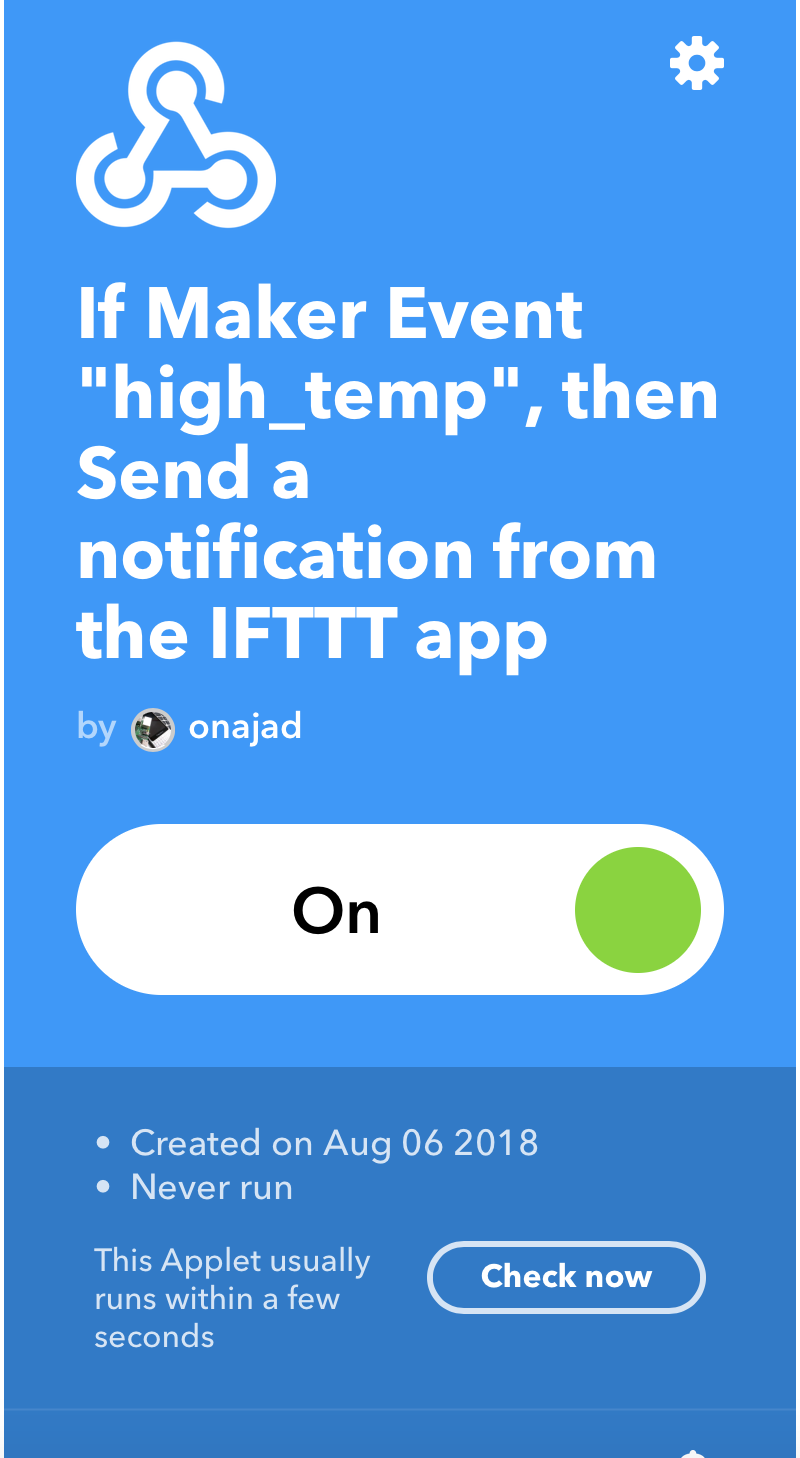
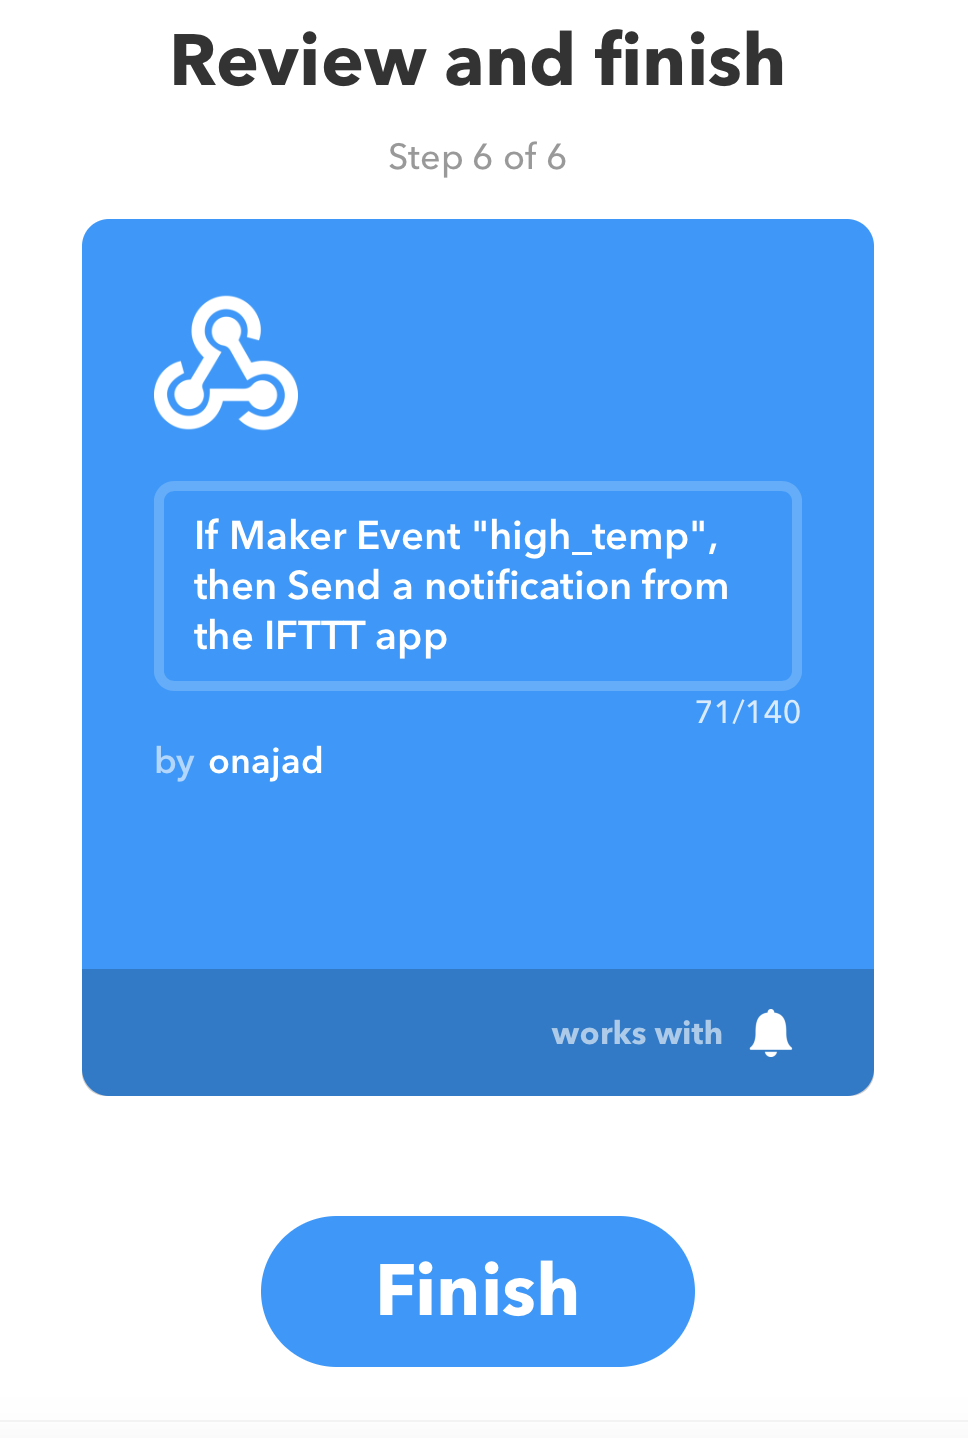
Now our Applet is ready to use

Now we need to get the HTTP request link to add to our processing sketch, for that go to My Applets page and click on Services tab and search for “webhooks” and click it.
Now inside the webhooks page, you can see a settings button on the top right side, click on it.

Inside the settings page, you can find a URL with your unique key, just copy that link and paste to a new tap of your browser.
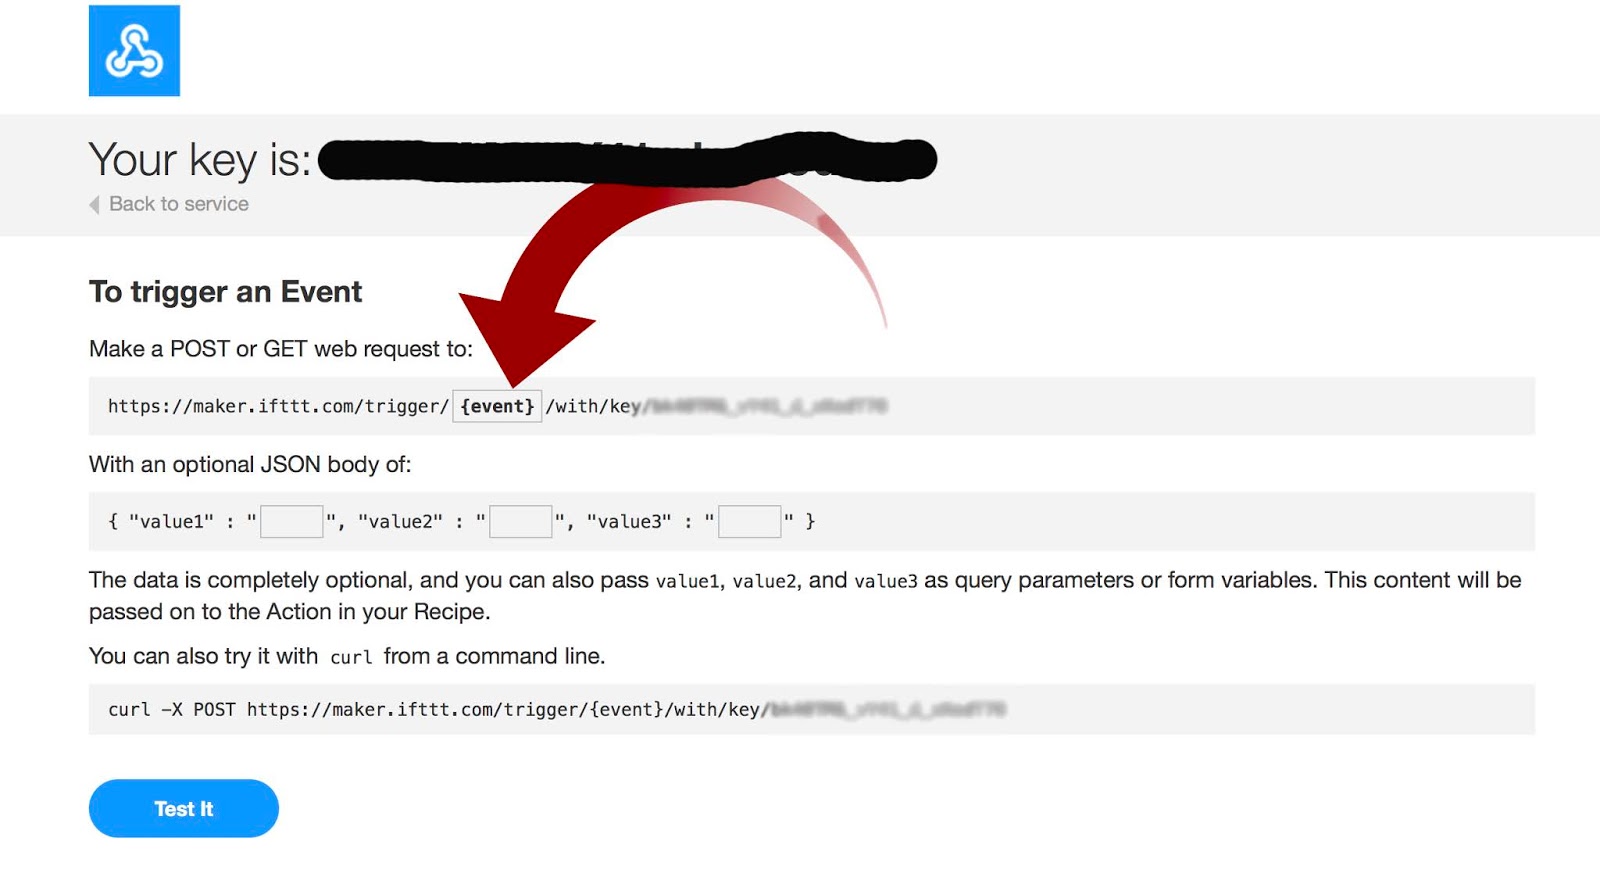
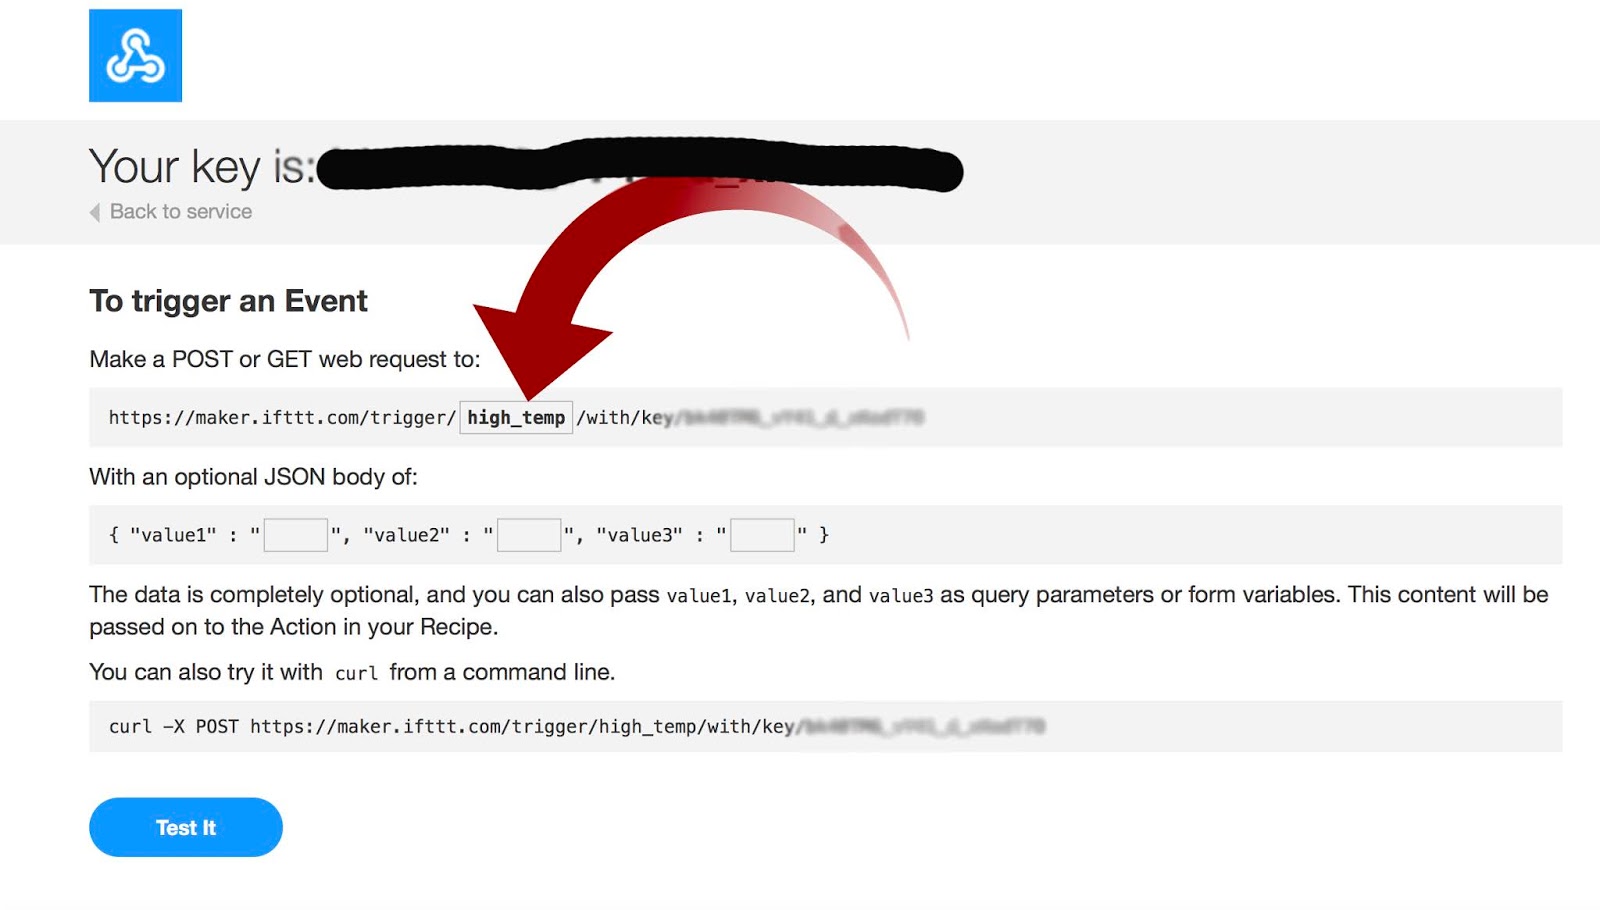
Here you can find your web request link, click on the {event}, I have marked it in the screenshot
and write the event name which we have given at the beginning that is “high_temp” without quotes.
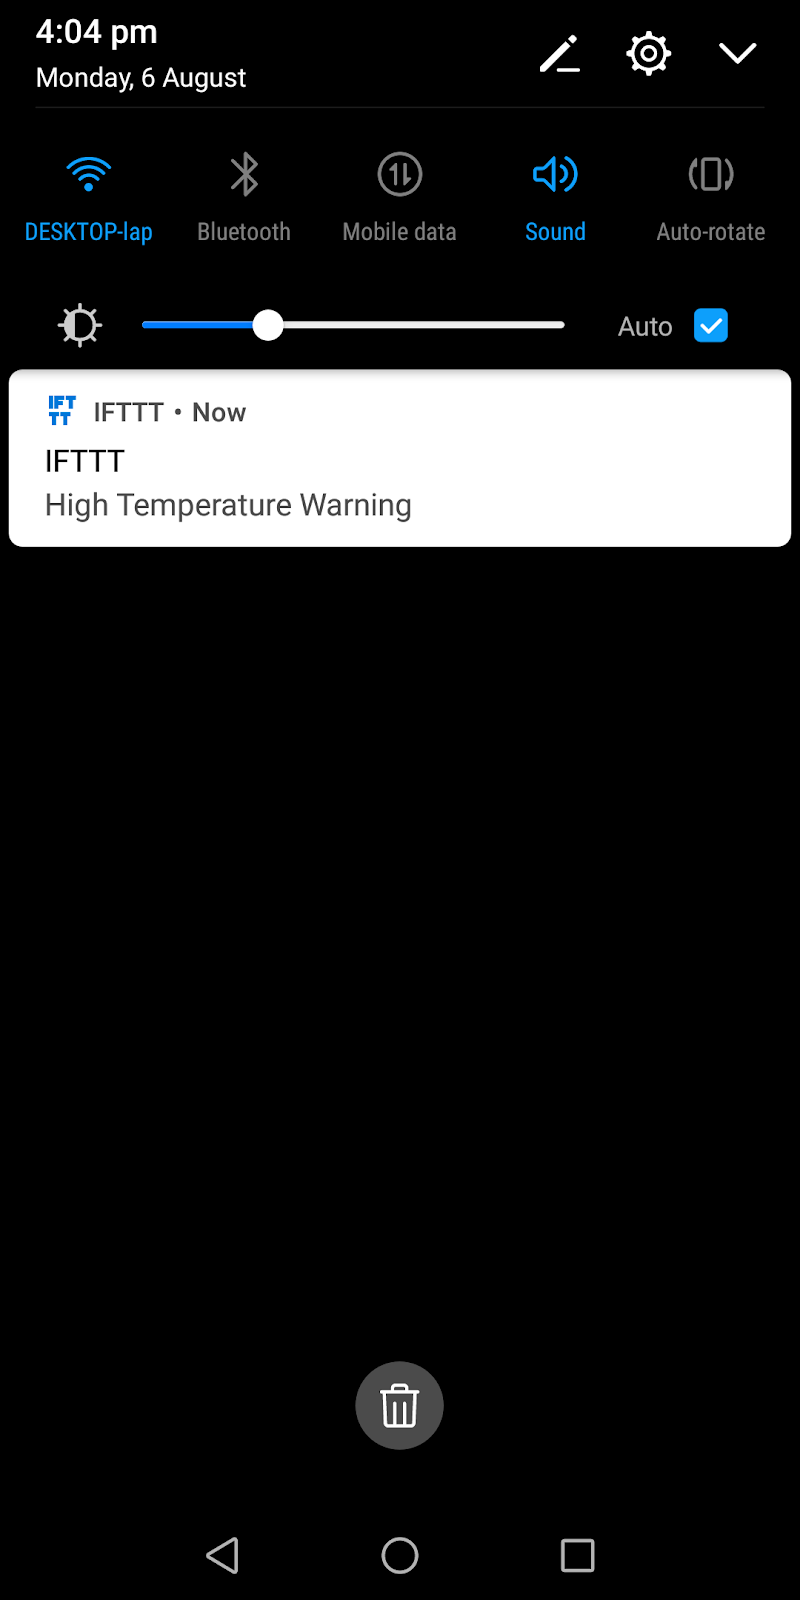
for testing just click the test it button, if everything is ok then you will get a notification on your phone as “High-Temperature Warning”. Before testing, you need to install the IFTTT app from play store and log in with the same account you have created the applet.
Step 3: Install the IFTTT app from play store, click here to install.
Step 4: Processing Code.
I’m just adding some codes to our previous processing sketch, click here to read the previous post.
In the processing sketch, we need to add the HTTP request link.
%22%20transform%3D%22matrix(6.25%200%200%206.25%203.1%203.1)%22%3E%3Cellipse%20fill%3D%22%235d5d5d%22%20fill-opacity%3D%22.5%22%20cx%3D%227%22%20cy%3D%2220%22%20rx%3D%2211%22%20ry%3D%2269%22%2F%3E%3Cellipse%20fill%3D%22%231e1e1e%22%20fill-opacity%3D%22.5%22%20rx%3D%221%22%20ry%3D%221%22%20transform%3D%22matrix(13.85484%20104.30748%20-132.18914%2017.55827%20150.5%203.3)%22%2F%3E%3Cellipse%20fill%3D%22%23414141%22%20fill-opacity%3D%22.5%22%20rx%3D%221%22%20ry%3D%221%22%20transform%3D%22matrix(-.71666%2027.36833%20-9.03524%20-.2366%208.4%2011.3)%22%2F%3E%3Cpath%20stroke%3D%22%232c2c2c%22%20stroke-opacity%3D%22.5%22%20fill%3D%22none%22%20d%3D%22M15.5%2035.6q5.6-28.4.3-51.6%22%20stroke-width%3D%22.5%22%2F%3E%3C%2Fg%3E%3C%2Fsvg%3E)
In the processing sketch, we need to add the HTTP request link.

In Action!!
Now, whenever the meter reading goes above the threshold value we will get a notification on our phone, like the one I have shown below.
So that’s it guys we have completed the integration of IFTTT to Processing. Let me know if you have any doubts. Please share the post if you like it and those who have not yet subscribed to the youtube channel please do subscribe
Code
import http.requests.*; //importing http request library
import processing.serial.*; //importing serial library
float flag=0;
PImage needle; // to store meter needle image
PImage meter; // to store meter image
float inByte; //to store incomming value from serial port
float reading=0; //to store mapped inByte value
Serial arduino; //naming our serial port as "arduino"
void setup() //only runs one time when program starts
{
  background(0); //making background color as black
  size(800, 800); //output window size 800 x 800 pixel
  //fullScreen(); //output window size full screen
  needle=loadImage("ndl.png"); //loading ndl.png image to needle
  meter=loadImage("meter.jpg"); //loading meter.jpg image to meter
  needle.resize(66, 66); //resizing needle image to fit our meter
  //printArray(Serial.list()); //listing serial port to find the port in which arduino is connected
  arduino = new Serial(this, Serial.list()[3], 9600); //initializing port, in my case arduino is no.4 in the list
}
void draw() //this will loop by 60 frame per second by default , frame rate can be changed by frameRate() function
{
  imageMode(CENTER); //draw image using center mode
  image(meter, width/2, height/2); //drawing meter image
  pushMatrix(); //saving current transformation matrix onto the matrix stack
  imageMode(CORNER); //draw image using corner mode
  translate((width/2)+2, (height/2)+15); //translating "(width/2)+2, (height/2)+15" to "0,0"
  rotate(((HALF_PI)-19.69)+reading); //rotation needle image to position to zero in meter image
  image(needle, 0, 0); //drawing needle image
  popMatrix();//removing the current transformation matrix off the matrix stack
  if (arduino.available()>0) //checking whether there is incomming serial values
  {
    inByte=arduino.read(); //storing incomming values to variable inByte
  } else
  {
    reading=0; //if no values are comming from our port reading will be zero
  }
  if (reading>4.69 && flag==0) //http request when the reading is above 4.69
  {
    flag=1;
    GetRequest get = new GetRequest("REPLACE YOUR REQUEST CODE");
    get.send();
    println("Reponse Content: " + get.getContent());
  }
  if (reading<4.69) //reseting flag value when reading goes below 4.69
  {
    flag=0;
  }
  reading=map(inByte, 0, 255, 0, 4.72); //maping and storing the inByte value from 0 to 255 to 0 to 4.72, watch the video to find how i got the value 4.72
  println(inByte);//printing inByte value , only for debuging purpose, we can command this line
}