
Introduction
In this project, I am going to teach you how to give multiple functions in a single push switch. Below is the list of different ways of using the switches for different functions,

- Single Tap
- Double Tap
- Triple Tap
- Four Tap
- Hold
- Tap and hold
“there can be more if you can be creative”
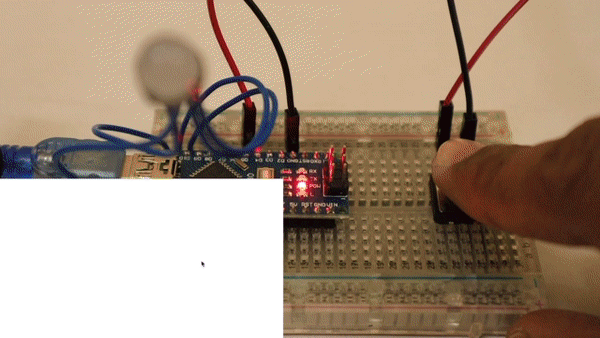
Demo
Things Required
- Arduino or any other compatible board
- Micro push button
- RGB LED, for testing the switch functions.
Theory
- First, we calculate the time gap between each button press and the number of times the button is pressed
- Then according to the no. of times, the button is pressed we are calling different functions
- like the same way if the time gap is more than the preset value then we consider it as a “hold” and we call the functions which we associate to it
watch the full video for detailed programming instructions.
Hardware Required
| Components | DIY Usthad | Amazon.com | Banggood | AliExpress | Utsource |
|---|---|---|---|---|---|
| Arduino Nano | |||||
| Push Button |
Circuit
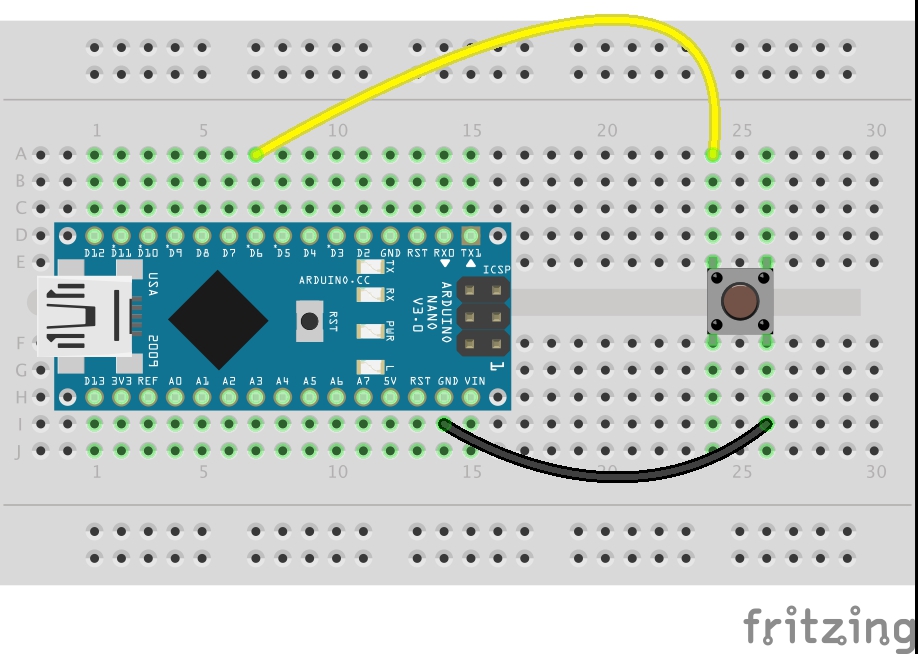
- Connect one leg of the push button to any digital pin.
- connect the other leg to the ground of Arduino.
Full Video
Part 1
Part 2
Code
//www.diyusthad.com
//www.youtube.com/c/diyusthad
//www.facebook.com/diyusthad
//program by diyusthad
//code for programming multiple functions to a single push button
#define sw 5 //pin at push sw is connected
#define red 12
#define green 11
#define blue 10

int lastButtonState = HIGH;   // the previous reading from the input pin
unsigned long lastDebounceTime = 0;  // the last time the output pin was toggled
unsigned long debounceDelay = 50;    // the debounce time; increase if the output flickers
bool buttonState = HIGH; //saving state of the switch
byte tapCounter; //for saving no. of times the switch is pressed
int timediff; //for saving the time in between each press and release of the switch
bool flag1, flag2; //just two variables
long double presstime, releasetime; //for saving millis at press and millis at release
void setup() {
  Serial.begin(9600); //for serial monitor
  pinMode(sw, INPUT_PULLUP); //setting pin 5 as input with internal pull up resistor
  pinMode(red, OUTPUT); digitalWrite(red, HIGH);
  pinMode(green, OUTPUT); digitalWrite(green, HIGH);
  pinMode(blue, OUTPUT); digitalWrite(blue, HIGH);

//  digitalWrite(red, LOW);
//  delay(1000);
//  digitalWrite(red, HIGH);
//  delay(1000);
//  digitalWrite(green, LOW);
//  delay(1000);
//  digitalWrite(green, HIGH);
//  delay(1000);
//  digitalWrite(blue, LOW);
//  delay(1000);
//  digitalWrite(blue, HIGH);

}

void loop() {

  int reading = digitalRead(sw);

  if (reading != lastButtonState) {
    // reset the debouncing timer
    lastDebounceTime = millis();
  }

  if ((millis() - lastDebounceTime) > debounceDelay) {
    // whatever the reading is at, it's been there for longer than the debounce
    // delay, so take it as the actual current state:

    // if the button state has changed:
    if (reading != buttonState) {
      buttonState = reading;
    }
  }
  //Serial.println(buttonState);

  //when switch is pressed
  if (buttonState == 0 && flag2 == 0)
  {
    presstime = millis(); //time from millis fn will save to presstime variable
    flag1 = 0;
    flag2 = 1;
    tapCounter++; //tap counter will increase by 1
    //delay(10); //for avoiding debouncing of the switch
  }
  //when sw is released
  if (buttonState == 1 && flag1 == 0)
  {
    releasetime = millis(); //time from millis fn will be saved to releasetime var
    flag1 = 1;
    flag2 = 0;

    timediff = releasetime - presstime; //here we find the time gap between press and release and stored to timediff var
    //Serial.println(timediff);
    //delay(10);
  }

  if ((millis() - presstime) > 400 && buttonState == 1) //wait for some time and if sw is in release position
  {
    if (tapCounter == 1) //if tap counter is 1
    {
      if (timediff >= 400) //if time diff is larger than 400 then its a hold
      {
        Serial.println("Hold");
        hold(); //fn to call when the button is hold
      }
      else //if timediff is less than 400 then its a single tap
      {
        Serial.println("single tap");
        singleTap(); //fn to call when the button is single taped
      }
    }
    else if (tapCounter == 2 ) //if tapcounter is 2
    {
      if (timediff >= 400) // if timediff is greater than  400 then its single tap and hold
      {
        Serial.println("single tap and hold");
        tapAndHold(); //fn to call when the button is single tap and hold
      }
      else // if timediff is less than 400 then its just double tap
      {
        Serial.println("double tap");
        doubleTap(); //fn to call when doubletap
      }
    }
    else if (tapCounter == 3) //if tapcounter is 3 //then its triple tap
    {
      Serial.println("triple tap");
      tripleTap(); //fn to call when triple tap
    }
    else if (tapCounter == 4) //if tapcounter is 4 then its 4 tap
    {
      Serial.println("four tap");
      fourTap();//fn to call when four tap
    }
    tapCounter = 0;
  }
  lastButtonState = reading;
}
void nolight()
{
  digitalWrite(red, HIGH);
  digitalWrite(green, HIGH);
  digitalWrite(blue, HIGH);
}
void singleTap()
{
  nolight();
  digitalWrite(red, LOW);
}
void doubleTap()
{
  nolight();
  digitalWrite(green, LOW);
}
void tripleTap()
{
  nolight();
  digitalWrite(blue, LOW);
}
void fourTap()
{
  nolight();
  digitalWrite(red, LOW);
  digitalWrite(blue, LOW);
}
void hold()
{
  nolight();
  digitalWrite(red, LOW);
  digitalWrite(green, LOW);
}
void tapAndHold()
{
  nolight();
  digitalWrite(green, LOW);
  digitalWrite(blue, LOW);
}
To buy electronic components order from UTSOURCE
i get stock cause i wanna use the super nice snippet code. You code and tutorial is awesome. I wanna execute all void function but in if and if else statement. I have a button but 2 toggle switch too. Depending of state of the 2 toggle switch, button act different function.
Example :
void singleTap() {
if (toggleA == true) {
nolight();
digitalWrite(red, LOW);
}
if (toggleA == false){
nolight();
digitalWrite (green, LOW);
}
if (toggleB == false){
digitalWrite(blue, LOW);
}
}
//‐———-same patteern for doubleTap, tripple 4th and the 2 hold and tap hold.
thanks if you can help me to bonify your idea with toggle switch true or false that helpme a lot if you have a clue how implemented i tryhard with you original code with switch case too but no succes. something block in the code when if statement is added as toggle. iam novice but try my best thanks to help and again nice code and tutorial iam very close of the goal.
Hi François Eric King, I am afraid I didn’t understand your question properly. Please share your complete code and tell me exactly what output you need. Ill try my level best to solve it for you.
What fonts are used in Arduino good?
Hello,
i’ve found your snippet of code for calculating easy between multi press modes for a button. The backgroud for me is, that i build a wallmounted touch switch. The communication works over WiFi/MQTT. But for the pressmodes i wanna use your code.
Is it ok for you, when i use your code and make some changes? At the end i want to release the project on github, and then your credentials are in my code 😉
Thank you for your answer
Best regards
derAlff
You are welcome to use it, thanks for asking
Wow, cool 🙂
are the following comments as credentials ok for you?
//www.diyusthad.com
//www.youtube.com/c/diyusthad
//www.facebook.com/diyusthad
//program by diyusthad
//code for programming multiple functions to a single push button
or you want other credentials?
Best regards
derAlff
Use the same
Hi,
Are you willing to help me with a small project I want to set up. I have 3 reed switches for 3 doors which i want LED’s to light up when doors are open. I know wiring is good as I can get the coding to work for all 3 individually, but when I try changing the code to include all 3 it fails.
«Int doorState» how do I specify each switch?
What goes after «if» «else» statement?
const int DOOR_SENSOR_PIN_A = 10; // OUTPUT pin for reed, door A
const int LED_PIN_A = 6; // LED pin A
const int DOOR_SENSOR_PIN_B = 11; // OUTPUT pin for reed, door B
const int LED_PIN_B = 4; // LED pin B
const int DOOR_SENSOR_PIN_C = 12; // OUTPUT pin for reed, door C
const int LED_PIN_C = 5; // LED pin C
int doorState;
void setup() {
Serial.begin(9600); // initialize serial
pinMode(DOOR_SENSOR_PIN_A, INPUT_PULLUP); // pin to input pull-up mode
pinMode(LED_PIN_A, OUTPUT); // output mode
pinMode(DOOR_SENSOR_PIN_B, INPUT_PULLUP); // pin to input pull-up mode
pinMode(LED_PIN_B, OUTPUT); // output mode
pinMode(DOOR_SENSOR_PIN_C, INPUT_PULLUP); // pin to input pull-up mode
pinMode(LED_PIN_C, OUTPUT); // output mode
}
void loop() {
doorState = digitalRead(DOOR_SENSOR_PIN_A); // state
doorState = digitalRead(DOOR_SENSOR_PIN_B); // state
doorState = digitalRead(DOOR_SENSOR_PIN_C); // state
if (doorState == HIGH) {
Serial.println(“The door is open”);;
digitalWrite(LED_PIN_A, LOW); // turn on LED
} else {
Serial.println(“The door is closed”);
digitalWrite(LED_PIN_A, HIGH); // turn off LED
}
}